
Storytelling Through Computer Animation
Assignment A6 on video formats and editing
Objectives- Learn about the Title Sequence, Opening Credits, and Closing Credits
- Learn about file formats and converting among them
- Learn to use Alice to create a movie file
- Learn to use an editor like MovieMaker to add credits and enhance your animations
Some film terminology
Opening credits are onscreen text verbally listing and optionally describing the key people involved in the making of a movie.A title sequence precedes an animation to present the title of the animation and optionally shows the key characters in the animation.
Note that the title sequence and opening credits should not be confused...When an animation has both a title sequence and opening credits, the opening credits usually appear first, but this is not a firm rule.
Closing credits are added at the end of an animation to list the cast (who ususally just did the voices) as well as the production crew involved in making the animation. Some animations have humorous closing credits with "out takes" or other devices to mimick film.
Here is the e-card I made using Alice:
Here it is after credits have been added:
 Adding to your animation
Your
task today will be to add a title sequence and closing credits to an
animated story or a card you made using Alice. You may use an
animation you made
for a previous assignment or you may create a new one. For
practice, lets begin with an existing animation.
Learning about file types
Files are stored on your computer in a large variety of formats, and this is the case for animation files as well. It is useful to be able to see what the file types are, but the default in Windows is to hide this information. To see this, please open your Control Panel, select Folder Options, Click on the View option and uncheck the box that says, "Hide extensions for known file types."
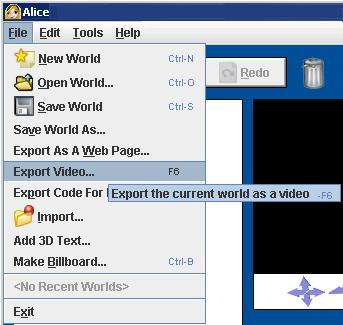
Now if you navigate to your folder with the Alice programming language files, you will see that these files use the .a2w extension. Files with this extension can be edited by Alice.If we want to post one of the Animations we create in Alice to youtube, Facebook, or other video hosting site such as Vimeo, then we need to export to a movie type of file. Alice allows us to export to a Quicktime file type, which ends with a .mov. This is easy to accomplish by just going under file, chooseing Export Video and then following the directions. Name your video yourusername-A6. It will recieve the file extension .move, so you will have a file called your username-A6.mov.
However, because the .mov is a proprietary format created by Apple, Windows is not fond of it. This means that if we want to use a video editing program, like Windows MovieMaker, the .mov format is not supported.
The other problem with the .mov format is that it can hold only a single sound track rather than the multiple soundtracks which other formats can hold. We will learn how to deal with this in a future assignment.
Windows MovieMaker supports the following input file formats:
|
So, to add a title sequence and closing credits to our animation, we need to do a file conversion to one of the acceptable video or movie file formats.
There are many file conversion programs which can make this conversion. If you do not already have one, I recommend downloading and installing one of the following by right-clicking on one of the following links:
- DVDSoft: http://download.cnet.com/Free-Studio/3000-2170_4-205258.html?tag=mncol;1 Be careful that you opt out of the junk during this install.
- Pazerea: http://download.cnet.com/Pazera-Free-3GP-to-AVI-Converter/3000-2194_4-10781718.html?tag=mncol Be careful where you put this download, so you can find it. After downloading you will need to unzip this folder. There is no need to install this program. Then use this program to convert from .mov format to .mpg format.
The .mpg (or .mpeg) stands for Moving Picture Experts Group. This file format was formed by the International Organization for Standardization (ISO) to set standards for audio and video compression and transmission. It is a very widely used format.
Now convert yourusername-A6.mov to yourusername-A6.mpg.
- On Windows 7: Use Windows Movie Maker 2.6 or Windows Live Movie Maker (Personally, I prefer Windows Movie Maker 2.6, but use the one you prefer. )
- On Windows XP: Use Movie Maker 2.1 (which should already be installed if you have done your updates)
- On a Mac: Use iMovie (installed on lab Macs and Hutchines Library Mac
After adding to your animation, you should save your work in two ways. If you want to be able to edit, you need to save as a MovieMaker project, which will be a .MSWMM format or .wlmp format. These MovieMaker Project formats cannot be posted on any of the video hosting sites. So, you will need to save your project as a movie file. When you do this, it will save in yet again another format, namely a .wmv format. Windows Media Video (.wmv) is a compressed video compression format, which is (yes, you guessed it) developed by Microsoft. It can be loaded onto any of the video hosting sites, youtube, Facebook, and Vimeo.
Whew!!
Here is a quick summary of your task today.
Add to your animation:
- Using Alice, export your animation to the video format, yourusername-A6.mov.
- Using DVDSoft or Pazera (or other video converter) convert yourusername-A6.mov to yourusername-A6.mpg.
- Open Windows MovieMaker, import yourusername-A6.mpg and add a title sequence and closing credits.
- In Windows MovieMaker, save your project as yourusername-A6.MSWMM or yourusername-A6.wlmp.
- Also in Windows MovieMaker, save your animation as yourusername-A6.wmv.
Note that you will only need to submit ONE thing!
To the document which contains your artist's statement yourusername-A6.doc, add a link to your uploaded video and submit to Moodle before our next class.