Using the conditional fork
Objectives
- Learn to use conditional (a.k.a. if) statements
- Learn about nested conditional statements
- Get further practice using randomness, containers, and looping
Tools and Parts Needed
- Constructed 2-Wheeled tail-dragger robot
Our lives are full of choices that we make based on a variety of conditions... a robot sometimes faces a similarly large array of choices. We have conditions and choices about going to college, taking the Introduction to Robotic course, what foods to eat, whether or not to exercise, and so on. . . Conditional statements are a vital part in any programming language, because a conditional statement enables a computer or robot to perform different actions based on different sets of conditions.
Conditional Statements
The conditional (if..else) statement is one of the basic conditional statements in most programming languages. A programmer uses this statement when s/he wants to carry out certain segment of code if a condition is true and another segment of code if the condition is not true. Consider the following pseudocode for the conditional statement:
- if condition B
- Action I
- else
- Action II
In the above pseudocode, Action I is taken if condition B is true and
Action II is taken if condition B is false.
In the following example, if the touch sensor is not pressed, the robot will move backward for 4 seconds and end the program, otherwise (meaning if the touch sensor is pressed), the robot will stop and the play red scroll music and end the program.
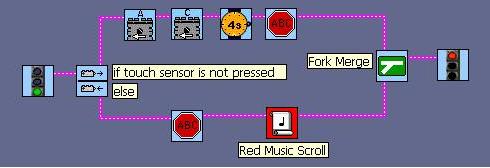
Here is the same program with land and jump icons designed to make the program loop forever:

Note that conditional if statements in ROBOLAB end with the following Fork Merge icon which returns the follow of control to a single wire:

Important note: every conditional statement must be closed by using the fork merge or the program may not compile.
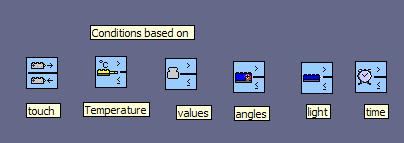
Conditional if statements in ROBOLAB start with "double icons" which either have two arrows in opposite directions or greater or lesser signs as follows:
Comment Lines Using the Edit Text Button
Adding comments to programs to make them more understandable is an important part of programming. We can see examples of such comments in the example program above. In the example, we see comments used to clarify the program icons as follows:

In RoboLab, explanatory comments are added to a program using the Edit
Text button: 
Nested Conditional if Statements
In all programming languages, one may nest conditional statements by having a conditional statement within another conditional statement. For example, consider the pseudocode for a nested set of conditionals:
- if condition A (condition A is true)
- if condition B (conditions A and B are both true)
- Action I
- else (conditions A is true and B is false)
- Action II
- else (condition A is false)
- Action III
In the above pseudocode, Action I is taken if conditions and B are true, Action II is taken if condition A is true but B is false, and Action III is taken if condition A is false. Conditional statements can be nested many layers deep.
You can also nest conditionals in each branch:
- if condition A
- if condition B (conditions A and B are both true)
- Action I
- else (condition A is true and B is false)
- Action II
- else
- if condition C (condition A is false and C is true)
- Action III
- else (conditions A and C are both false)
- Action IV
Your Task
- Use conditionals to to make your robot will move around
apparently randomly, demonstrating at least four different
behaviors based upon different values of the random number.
Your program must have the following features:
- Stored random number: In this program have the robot choose a random number and store this number in a container, so you can use it multiple times.
- LCD Screen: Show the random number on the LCD screen.
- Four different
behaviors: Using
nested conditionals make at least four different robotic
behaviors happen based upon a single random number which you
place in a container and show on the LCD screen. Use
different numeric thresholds to make different behaviors happen.
For example, you might have the robot pick a random number
between 0 and 7 and put it into the red container. Then you can
create four different behaviors with the following nested
conditional statement:
The kinds of behaviors you choose should appear different and can involve driving forward, driving backwards, spinning, beeping, etc. You could even use a second random number to determine motor speeds, but if you do be sure to restrict that number to the numbers between 1 and 5.- if the number in the red container <=3
- if the number in the red container <=1
- Action I (taken when the number is 0 or 1)
- else
- Action II (taken when the number is 2 or 3)
- if the number in the red container <=1
- else
- if the number in the red container <=5
- Action III (taken when the number is 4 or 5)
- else
- Action IV (taken when the number is 6 or 7)
- if the number in the red container <=5
- if the number in the red container <=3
- Continuous Looping: Once you have all of the above working, the behavior of your robot should appear random, so add looping to make the robot run continuously.
- If you want to add more than four behaviors, go for it!
- First, use pseudocode to design your program.
- Next, implement your ideas in RoboLab. To create your own
Robolab program, close the RoboLab Training Mission, and open
RoboLab again in the Programmer: Inventor 4 mode. Name the
program yourusername1-yourusername2-L9.
Implement your ideas on your robot by adding the needed sensors
and actuators to your robot, writing this RoboLab program, and
trying it on your robot.
- For this lab, it is also required that you include some
explanatory comments to your RoboLab code by using the Edit Text
icon:
In particular, it is required that you add the following
comments:
- Lab L9
- All of your team member's names
- Comments on at least two program icons
- Finally, modify your pseudocode, robot, and RoboLab program to
improve your robot's performance.
- Answer questions in your Lab Report.
Your Lab Report
All lab reports should be self-contained and should contain all of the following information at the top:- The lab number: Lab L9
- How long each person served in each of the roles:
- Driver:
- Navigator
- Your Pseudocode: Include the final version of your pseudocode in your Lab Report. Be sure to describe in detail specifically under which conditions your robot will exhibit each of the desired behaviors that you programmed. Using one of the kinds of pseudocode charts shown above is recommended for clarity.
- Your Robot: Briefly describe which sensors and actuators need to be attached to which ports for your implementation.
- Your Success: In a paragraph or so, describe how to use your program and whether or not your robot functions as desired. If not, what goes wrong and under what conditions?
- Comments and Suggestions: Write a paragraph which summarizes your team's reaction to RoboLab and to this lab. If there are any problems you encountered or any questions that remain, please ask! Also, be sure to include any suggestions you have for how this lab could be improved.