Developing an algorithm which employs the light sensor
Objectives
- Use the light sensor and the RCX on a more challenging programming problem
- Work on algorithm development
Tools and Parts Needed
- Constructed 2-Wheeled Robot
- A light sensor
Algorithm Development
An algorithm is a series of instructions in a specific order, designed to perform a specific task. As the task becomes more complicated, algorithm development becomes more challenging, so planning the algorithm in advance becomes even more important.
In this lab, there will not be any new hardware or new sensors or new programming constructs--the main purpose of the lab is to reinforce concepts you have already encountered by applying them to the algorithm for a new and more challenging task.
| Light Sensor Refresher
Recall that the light sensor measures the amount of light that it sees. It reports the amount of light to the RCX as a number between 1 (total darkness) and 100 (very bright). The light sensor uses its own light source, a red LED to illuminate a small area in front of its receiver. The light sensor contains an LED and a photo-transistor. The LED emits light that is reflected off of a surface and picked up by the photo-transistor. The value read depends on the brightness of the surface. A light sensor is an analog sensor. It reads the percentage of light that it receives and transmits that data to the RCX. When programming the light sensor, a threshold value must be obtained - this is done by adding the light value and the dark value and dividing by 2. |
 |
Icon Refresher
You may want to use some of the following programming constructs:
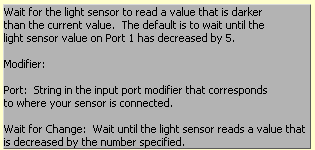
"Wait for darker" 
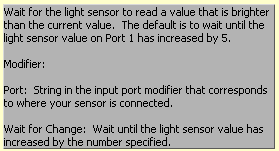
"Wait for lighter" 
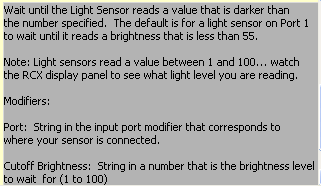
"Wait for dark" 
"Wait for light" 
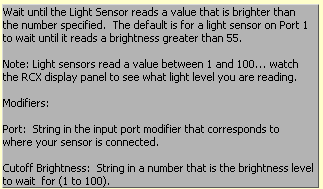
"Modifiers"  which are good
for modifying motor speed as well as indicating what you want to show
in the display.
which are good
for modifying motor speed as well as indicating what you want to show
in the display.
"Set display" 
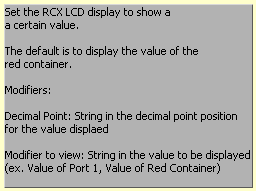
With the set display, we must use the "value of port #" modifier like so:
 because the default is set to show the wrong thing.
Adding comments to programs to make them more understandable
is an
important part of programming.
In RoboLab, explanatory comments are added to a program using the Edit
Text button:  .
Please add the following type of comment on the Lab number
and
the identities of the members of your team to the top left of ALL your
RoboLab programs:
.
Please add the following type of comment on the Lab number
and
the identities of the members of your team to the top left of ALL your
RoboLab programs:
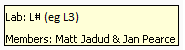
Please note that this is lab L6.
Your Task
In this lab, you will design a program to make the robot drive around the black track line on the provided track. Note that it is simplest to follow one of the edges of the track.- Discuss how you might design a program which will result
in the robot driving around the
black track line. In particular, it is important to decide where your robot will begin and whether it will
drive clock-wise or counter clockwise.
Will it drive on the inside edge of the
track or on the track or outside edge of the track?
Will the initial
position of the light sensor be over the white or over the black?
- Then design and implement your own pseudocode
to have the robot drive around the track. When you have
completed
this planning, show the TA, your initial pseudocode
plan.
- Next, implement your ideas in RoboLab using the Inventor 4
level. To
create your own RoboLab program, open RoboLab again in the Inventor 4
mode. Name the program yourusername1-yourusername2-L6.
Implement your ideas on your robot by adding any needed sensors and
actuators to your robot, writing this RoboLab program, and trying it on
your robot.
- Finally, modify your pseudocode, robot, and RoboLab program code to improve your robot's performance. If you really want a challenge, try to increase your robot's speed!
Your Lab Report
All lab reports should be self-contained and should contain all of the following information at the top:- The lab number: Lab L6
- How long each person served in each of the roles:
- Driver:
- Navigator
- The robot's initial position and direction of
travel: Describe
where the robot will begin the program. Inside the track or on the
track or outside the track? Will the initial position of the
light sensor be over the white or over the black?
- Changing the robot's initial position and
direction of travel: Describe
specifically what you must change if the robot starts in a place other
than expected or drives in the reverse direction around the track.
- Your robot's sensor set-up: Briefly
describe which
sensors and actuators need to be attached to which ports for your
track-following implementation.
- Your pseudocode: Include the final
version of your track-following pseudocode in your Lab Report.
- Your success: In a paragraph or so,
describe how to use
your program and how effective your track following implementation was.
Does the robot need to start in a particular place on the track? Is
your robot able to actually "follow" the track? Under what conditions
does your program work? Under what conditions does it fail to
work?
- Comments and suggestions: Write a paragraph that summarizes your team's reaction to RoboLab and to this lab. If there are any problems you encountered or any questions that remain, please ask! Also, be sure to include any suggestions you have for how this lab could be improved.