Introduction to Robotics
Using the light sensor
Objectives
- Learn to use the light sensor and learn new icons related to light
Tools and Parts Needed
- Constructed 2-Wheeled "Tracker" Robot
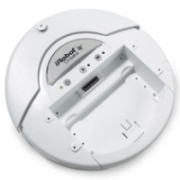
- A light sensor
- Additional Lego parts for attaching the sensor
| The Light Sensor
The light sensor measures the amount of light that it sees. It reports the amount of light to the RCX as a number between 1 (total darkness) and 100 (very bright). The light sensor uses its own light source, a red LED to illuminate a small area in front of its receiver. The light sensor contains an LED and a photo-transistor. The LED emits light that is reflected off of a surface and picked up by the photo-transistor. The value read depends on the brightness of the surface. A light sensor is an analog sensor. It reads the percentage of light that it receives and transmits that data to the RCX. When programming the light sensor, a threshold value must be obtained - this is done by adding the light value and the dark value and dividing by 2. |
 |
Pseudocode
If a robot is to go forward until it crosses a black line, and then it is programmed to stop, the pseudocode might be:
- Begin program
- Run motors A and C forward
- Until the light sensor senses the dark line then
- Stop driving forward
- End program
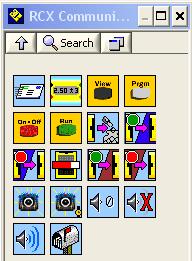
Useful RoboLab Wait For Icons
The RoboLab "wait for darker" icon, which looks like  , is located in the "Wait for" sub menu, and tells the robot to "wait for"
the light sensor to sense a darkening. There is an analogous icon
called "waitforlighter" which looks like
, is located in the "Wait for" sub menu, and tells the robot to "wait for"
the light sensor to sense a darkening. There is an analogous icon
called "waitforlighter" which looks like  and senses a lightening. Which one of these might you want to use for the above pseudocode?
Note that the "wait for darker" and "reverse motor" icons can have "modifiers"  attached
to indicate a change from the default values. If you
double-click on an icon, RoboLab will tell you what the default values
are for that command.For example, when no modifier is used, the default
will be used, which in the case of motors is full power, which is level
5. In the case of the light sensor, the modifier indicates which
port the light sensor is on. The motor modifiers indicate that level 2
should be used instead of 5. Modifiers are wired with the regular
wiring tool, but the resultant wires are blue.
attached
to indicate a change from the default values. If you
double-click on an icon, RoboLab will tell you what the default values
are for that command.For example, when no modifier is used, the default
will be used, which in the case of motors is full power, which is level
5. In the case of the light sensor, the modifier indicates which
port the light sensor is on. The motor modifiers indicate that level 2
should be used instead of 5. Modifiers are wired with the regular
wiring tool, but the resultant wires are blue.
You may want to use some programming structures which seem very similar namely, "Wait for Dark" and "Wait for Light"
  .
How do these differ? If you want to be able
to distinguish between the white space, the black track, and the green
markers, so "wait for darker" is not going to be sufficient if we want
to do something only when we sense black. The light sensor is
a versatile active sensor which emits light and return the
percent of that light that is reflected back into the sensor. Since a
black line reflects nearly no light back, you can expect the black line
reading to be near 0, while the white space will reflect back nearly
all the light, so you can expect that to be near 100. Green will
be in between these extremes, so you will need to use a modifier set
thresholds which work. These thresholds will depend upon the
light level in the room, so they will vary, but expect that a threshold
of about 40 to be in the ballpark.
.
How do these differ? If you want to be able
to distinguish between the white space, the black track, and the green
markers, so "wait for darker" is not going to be sufficient if we want
to do something only when we sense black. The light sensor is
a versatile active sensor which emits light and return the
percent of that light that is reflected back into the sensor. Since a
black line reflects nearly no light back, you can expect the black line
reading to be near 0, while the white space will reflect back nearly
all the light, so you can expect that to be near 100. Green will
be in between these extremes, so you will need to use a modifier set
thresholds which work. These thresholds will depend upon the
light level in the room, so they will vary, but expect that a threshold
of about 40 to be in the ballpark.
The RoboLab Help and Search Features
You can use the LCD display,  ,
for displaying the light levels which are returned by the light-sensor.
Locate "Set Display" by searching By double-clicking, you
will see the
sub menu of the Functions menu which contains your search item, in this
case, you should see:
,
for displaying the light levels which are returned by the light-sensor.
Locate "Set Display" by searching By double-clicking, you
will see the
sub menu of the Functions menu which contains your search item, in this
case, you should see:
To use the LCD display, you will need to string a modifier
which indicates what you want to display. You will want to
display the value of the appropriate input port, namely one of
the following:  . String in the number of the port where the light sensor is attached. Because this display is a form
of communication, this icon can also be found in the communications menu
under the Communications
. String in the number of the port where the light sensor is attached. Because this display is a form
of communication, this icon can also be found in the communications menu
under the Communications  icon if you want to locate it without searching.
The following two command icons can be used to actuate the RCX's speaker:
RoboLab Sounds
 is one Play
Sound Icon. It is also possible to use modifiers to play different sounds as follows:
is one Play
Sound Icon. It is also possible to use modifiers to play different sounds as follows:
- = Key Click
- = Beep Beep
- = Descending Sweep
- = Rising Sweep
- = Buzz
- = Fast Rising Sweep (default sound-like when you successfully load a program)
 is the
Music Icon which we will use in future labs.
is the
Music Icon which we will use in future labs.
Looping Forever in RoboLab
When you have a section of code which you want to repeat, the structure you need to do the repetition is called a loop. It is generally a best practice to get the inside section of a loop working correctly before adding the loop structure. In RoboLab, you can create a forever loop structure which will loop infinitely many times or until the batteries die or the engineer stops the program with the following set of icons:Place the loop forever start at the beginning of that section of code: 
and place a loop forever end at the end of that section of code: 
Alternatively, you can use Lands and Jumps to create a loop:
 is a Land Icon
 is a Jump Icon
Land and Jump Icons also work in colored pairs to repeat sections of code
forever.
The loop structure is one of the most
important structures in all of programming and are used when you want a
set of instructions to be performed repeatedly. There are several types
of loops in most programming languages. The infinite
loop repeats
the set of statements contained inside it forever.
- Infinite loops are created in Inventor mode by using pairs of Land Icons and
Jump Icons ,.
- When
an Inventor RoboLab program is first executed, it will ignore any Land Icons
, until the program reaches a Jump Icon , then
it will "jump back" to the Land Icon of the same color.
- Thus
if you have a Land Icon near the beginning of your
program and a Jump Icon near the end, your robot will
continue to run the sections of
code between these icons forever. This kind of programming structure is particularly useful
for robots in industrial settings because the robot's only task might
be to deliver parts to an assembly line, go back and get more parts to
deliver, etc.
You may use any of these icons in this lab--just remember that they must be used in matched pairs.
Comment Lines Using the Edit Text ButtonAdding comments to programs to make them more understandable is an
important part of programming.
In RoboLab, explanatory comments are added to a program using the Edit Text button:  .
Please add the following type of comment on the Lab number and
the identities of the members of your team to the top left of your
RoboLab program:
.
Please add the following type of comment on the Lab number and
the identities of the members of your team to the top left of your
RoboLab program:
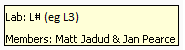
Please note that this is lab L6.
Your Task
In this lab, you will design and implement the following RoboLab program:- Design a program which will result in the robot "becoming trapped inside the white paper track"--it should drive about staying inside of the black circular track as follows:
- Start your robot inside the track driving forward.
- Include the "Set Display" icon so you can always see the value of the light sensor in your robot's display.
- Design a program so that your robot to use the light sensor to detect the edge of the track when it is driving forward. When it senses the track, have it stop and make one or more of the sounds. After waiting a bit, have it slowly back up a very short distance and turn around (roughly 180 degrees.)
- All this (actions a and b) should then repeat by the robot driving forward until it senses the black line... So, the robot should do this sequence forever (or you turn it off or the batteries die or the class ends.) The trick here is to make sure that your robot stays inside the track even when turning around.
- Next, implement your ideas in RoboLab. To create your own RoboLab program, open RoboLab again in the Programmer: Inventor 4 mode. Name the program yourtablename-L5.vi. Implement your ideas and trying them on your robot.
- Be sure to add the comment lines giving the lab number and your names and roles to your program.
Your Lab Report
All lab reports should be self-contained and should contain all of the following information at the top:- The lab number: Lab L5
- How long each person served in each of the roles:
- Driver:
- Navigator
- Your Pseudocode: Include the final
versions of your pseudocode in your Lab Report.
- Your Robot: Briefly
describe which
sensors and actuators need to be attached to which ports for these
implementations. Also,
briefly describe how to use your robot for each part. For
example, be sure to describe where your robot needs to be initially
placed.
- Light Sensor and display: Did
you have any difficulties with the light sensor itself? Were you
able to read the values of the light sensor on the display? If
so, did you find this helped you with the lab?
- Your Success: In
a paragraph or so,
describe how successful you were for each part. Does your robot
consistently "see the line? Does your robot
"act trapped inside the track?" ? Is your robot able to always
able to turn around? Under
what conditions does your program work? Did you find that differnt lighting conditiions affected the light-sensor?
- Comments and Suggestions: Write a paragraph that summarizes your team's reaction to RoboLab and to this lab. If there are any problems you encountered or any questions that remain, please ask! Also, be sure to include any suggestions you have for how this lab could be improved.