Using sensors for interaction with the environment
Objectives
- Learn to use the touch sensor
- Learn to use sound
- Learn to use randomness
Tools and Parts Needed
- Constructed 2-Wheeled "Tracker" Robot
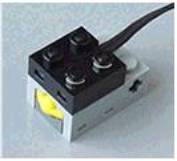
- a touch sensor such as might be embedded in a bumper
- Additional Lego parts for attaching sensors
More About the RCX
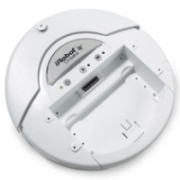
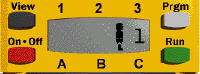
Each RCX contains a Renesas H8/300 microcontroller as its internal CPU (Central Processing Unit), which is the robot "brain". In this lab, we will begin to use a sensor which can be attached to the RCX on one of three Input ports, named Inputs 1, 2 and 3. These Input ports are used to connect sensor devices such as touch sensor and light sensor to RCX so that the robot can collect information from its environment. Recall that actuators such as motors or lamps are connected to any of three Output ports marked A, B. and C. Between the Input and Output ports is the LCD screen which is useful in obtaining information from the robot.
 (img
src:http://challenge.enoreo.on.ca/teachers/tutorials/start/rcxunit.htm)
(img
src:http://challenge.enoreo.on.ca/teachers/tutorials/start/rcxunit.htm)
Here is a good view of a RCX and where some of the sensors and actuators are connected.
 http://asuweb.asurams.edu/engineering/Lego/RoboLab_new_files/image002.jpg
In the above picture, light sensor is connected to Input port 1, touch sensor to Input port 2, and temperature sensor to Input port 3. Two motors are connected to Output port A and C, and a lamp is connected to Output port B.
One distinction between a robot and a computer is that a robot is a machine with sensors, actuators, and effector that can do some sort of work on its own. Acquisition of sensors and the ability perform task by its own distinguishes them from many other man-made machines. For RCX robots, four sensors: touch, light, temperature and rotational sensors are typically used.
In this lab you will create a new Inventor Level 4 program using only the touch sensor (embedded in a bumper.)| The Touch Sensor
The touch sensor detects contact with objects in the robot's environment. The touch sensor reports to the RCX if its button is pressed or not pressed. A touch sensor works like a light switch. When the button is pressed, an electrical circuit is closed inside the sensor. This lets electricity flow. When the button is released, the circuit is broken and no electricity flows. The RCX senses this flow of electricity so it knows if the touch sensor is pressed or released. |
 |
Wait For Icons
In the Wait For
submenu under the  icon, you will find two icons which looks very similar
  and
and  .
They are not the same even though they appear similar. Can
you tell how they are different? Using the help features can help
you to figure this out!
.
They are not the same even though they appear similar. Can
you tell how they are different? Using the help features can help
you to figure this out!
Exploring the RoboLab Help and Search Features
RoboLab has some built-in Help features which are very
useful in learning to use. On both the Controls Palette as well
as the Functions menu of programming icons, you will see the  button. Push this button and search for how one might set the
display on the LCD screen on the robot. You should have found
"Set Display." By double-clicking, you will see the
submenu of the Functions menu which contains your search item, in this
case, you should see:
button. Push this button and search for how one might set the
display on the LCD screen on the robot. You should have found
"Set Display." By double-clicking, you will see the
submenu of the Functions menu which contains your search item, in this
case, you should see:
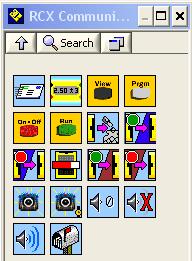
Notice, by hovering your cursor over each of these icons, you can see
which of them is the icon you are looking for. (Of course, you
might also just be able to tell from the appearance of the icon, but
try the "hovering".)
Note also, by either right-clicking on any icon in the menu or by
dropping that icon into your Block Diagram programming area, you can
read help menu information about how each icon works. For some icons,
the Help feature even gives an example program to help you to
understand how to use the icon. Try dropping the "Set Display"
icon into your programming area and double-clicking it. Try also
double-clicking some other icons.
Using Modifiers
In
this lab, we will use some new idons and we will use modifiers for some
icons. For example, in the example below, we see a "modifier"
hanging off of the motor forward icon. This sets the motor speed.
On the RCX, there are 5 motor speeds (but 1 is too slow to
acutally work, so there are really only 4). They are: 
This example turns on all connected motors at power level 4. The motors stay on for a random amount of time between 0 and 5 seconds and then the robot will stop.
 is the Wait For Random Time Icon, which is located in the Wait For
submenu under the icon.
is the Wait For Random Time Icon, which is located in the Wait For
submenu under the icon.
This icon works much as the other "Wait For" Icons which we have already seen except that it waits for a random amount of time rather than a specified amount. You can use a modifier to set the maximum time.
The following two command icons can be used to acuate the RCX's speaker:
On Sound Icon Modifiers
 is the Play
Sound Icon which we will use in this lab.
is the Play
Sound Icon which we will use in this lab.
It is actually possible to use modifiers to play different sounds as follows:
- = Key Click
- = Beep Beep
- = Descending Sweep
- = Rising Sweep
- = Buzz
- = Fast Rising Sweep (default sound-like when you successfully load a program)
 is the
Music Icon which we will use in future labs. Please do not use it in this lab.
is the
Music Icon which we will use in future labs. Please do not use it in this lab.
Recall Pseudocode
Many of you might be familiar with the term "pseudo" which is a Greek word means "false". Therefore, pseudocode is outline of a computer program, but written in plain English. For example, if a robot is to go forward until it crosses the touch sensor is pressed, and then it is programmed to drive slowly backwards for 2 seconds, the pseudocode might be:
- Begin program
- Run motors A and C forward
- Until the touch sensor is pressed
- Stop all motors
- Run motors A and C backwards for 2 seconds
- End program
Pseudocode can be very useful technique to save time as well as reduce stress. It is especially helpful for complex and large scale programming. It makes you plan what needs to happen in your program and how the program should be constructed. Therefore, it is important to design pseudocode for every programming task that you do. Note that pseudocode is not made up of RoboLab icons!
Comment Lines Using the Edit Text ButtonAdding comments to programs to make them more understandable is an
important part of programming.
In RoboLab, explanatory comments are added to a program using the Edit Text button:  .
Please add the following type of comment on the Lab number and
the identities of the members of your team to the top left of your
RoboLab program:
.
Please add the following type of comment on the Lab number and
the identities of the members of your team to the top left of your
RoboLab program:
Here is an example program which uses some of these ideas:
Your Task
- In this lab, you will design and implement your own program.
- First design pseudocode for a program which will result in the following robotic behavior:
- Have your robot drive forward for as long as it takes until the touch sensor is pressed.
- Then have your robot stop and make a sound or sounds.
- Then have your robot back up for a random amount of time.
- Then have the robot spin around for 2 seconds and then stop and wait for one second before moving again.
- Then make the robot move once again--your choice how it moves and for how long. Just be sure your pseudocode is clear on what is intended.
- Next, implement your ideas in RoboLab. To create your own Robolab program, open RoboLab again in the Programmer: Inventor 4 mode. Name the program yourusername1-yourusername2#-L4. Implement your ideas on your robot by adding any needed sensors and actuators to your robot, writing this RoboLab program, and trying it on your robot.
- Be sure to add the comment lines giving the lab number and your names and roles to your program.
- Finally, modify your pseudocode, robot, and RoboLab program to improve your robot's performance.
Your Lab Report
All lab reports should be self-contained and should contain all of the following information at the top:- The lab number: Lab L4
- How long each person served in each of the roles:
- Driver:
- Navigator
- Your Pseudocode: Include the final version of your pseudocode in your Lab Report.
- Your Robot: Briefly describe which sensors and actuators need to be attached to which ports for your program to work.
- Testing: Run your program 5 times, recording the robot's behavior on each run in your lab report.
- Your Success: In a paragraph or so, describe how to use your program and whether or not your robot acts as expected? Under what conditions does your program work?
- Comments and Suggestions: Write a paragraph that summarizes your team's reaction to RoboLab and to this lab. If there are any problems you encountered or any questions that remain, please ask! Also, be sure to include any suggestions you have for how this lab could be improved.