CSC 126 Robotics
Simulation Environments
Objectives
- Download and install required software
- Learn more about simulation software
- Learn about variables and assignments URBI
Tools and Parts Needed
Introduction to
Webots
Webots is a three-dimensional mobile robot simulator
from www.cyberbotics.com,
which was originally developed as a research tool for investigating
various control algorithms in mobile robotics. Most of the information on Webots in this
lab has been adapted from the Webots UserGuide. To install
Webots, download webots-5.1.7_setup.exe,
and use the installation wizard. This is an
evauation version of Webots which can be used only for:
(1) evaluation of the suitability for a particular purpose.
(2) participation in the roboka contest (http://roboka.org).
(3) installation of a registered version of Webots.
To run a simulation in Webots, you need to define a world.
A world in Webots is a 3D virtual environment in which you
can create objects and robots. A world is saved in the worlds
directory, in a .wbt file which contains a
description for any object: Its position, orientation, geometry,
appearance (like color, brightness), physical properties, type of
object, etc. A world is a hierarchical structure where objects can
contain other objects. For example a robot can contain two wheels, a
distance sensor and a servo which itself contains a camera, thus making
the camera moveable relatively to the robot thanks to the servo.
Webots allows the user to create 3D virtual worlds with
physics properties, such as mass, joints, friction coefficients, etc.
The user can add both simple inert objects or active mobile
robot objects. These robots can have different locomotion schemes
(wheeled robots, legged robots or flying robots). Moreover, they be
equipped with a number of sensor and actuator devices, like distance
sensors, motor wheels, cameras, servos, touch sensors, grippers,
emitters, receivers, etc. Finally the user can program each robot
individually to exhibit a desired behavior. Webots also
contains a number of interfaces to real mobiles robots, so that once
your simulated robot behaves as expected, you can transfer its control
program to a real robot like LEGO Mindstorms and Aibo, etc.
However, a world file does not contain all the information
necessary to run a simulation. The controller of each robot is
specified in the world file by a reference to an executable binary
file, but the world file doesn't contain this executable binary file.
A controller is an executable binary file which is used to
control a robot described in a world file. Controllers are stored in
subdirectories of the Webots controllers directory. Controllers may be
executables files (.exe
under Windows) or Java binary files (.class).
Open Webots and go to the file/ open menu item and open the file worlds/aibo_ers7.wbt,which
is a world containing an ERS-7 Aibo robot in a stadium-like arena.
The default Aibo world comes with a pre-configured controller,
which will make the robot walk for a few steps. When you start the
simulation, you will see the Aibo model walk forward, and kick the red
ball. Of course, you can also edit the world and select another
controller (change the controller property of
Aibo's root CustomRobot node), or get rid of it
altogether (simply select void as a controller).
Available Aibo controllers are located in Webots controllers/ers*/
directories.
Other Aibo worlds
There are other worlds available which contain an Aibo
robot.
 The Rough World is located in worlds/aibo_ers7_rough.wbt.
It contains a single Aibo robot placed onto a rough terrain structure.
Like in the default world, when you run the simulation the robot will
walk forward for a few steps. You can see how the walk sequence is
disturbed by the ground relief. This world is primarily designed to
test walking algorithms on uneven terrains.
The Rough World is located in worlds/aibo_ers7_rough.wbt.
It contains a single Aibo robot placed onto a rough terrain structure.
Like in the default world, when you run the simulation the robot will
walk forward for a few steps. You can see how the walk sequence is
disturbed by the ground relief. This world is primarily designed to
test walking algorithms on uneven terrains.
The Soccer World is located in worlds/aibo_ers7_soccer.wbt.
It contains two teams containing three Aibo robots, each team bearing its own
color. Again, when you run the simulation, all robots will start
walking and stop after a few paces. This
particular simulation requires considerable computing power, because
all 6 Aibo robots' default controllers access their cameras at each
cycle.
The Soccer World is designed to prepare your robots
for the Robocup
Sony Four-Legged Robot League. Use it to test your algorithms
in simulation before you transfer them to the real robots. This should
spare your robots in case you use particularly stressful mechanisms
like the now famous Robocup soccer knee-walk algorithm.
 The
Models World is located in worlds/aibo_ers7_models.wbt
world file. It contains available Aibo model objects for given ERS-7, placed
onto a simple flat checked ground. Unlike the other worlds, the robots have no
associated controller, so running the
simulation will have no spectacular effect.
The
Models World is located in worlds/aibo_ers7_models.wbt
world file. It contains available Aibo model objects for given ERS-7, placed
onto a simple flat checked ground. Unlike the other worlds, the robots have no
associated controller, so running the
simulation will have no spectacular effect.
These worlds are designed to showcase available model objects,
as well as for use with manual control, e.g., to test new or existing
MTN motion sequences, or establish a remote connection and observe the
real robot.
The
Webots Wizard Menu
The Wizard menu
is useful to
facilitate the creation of a new user directory or the creation of a
new
robot controller. A user directory is a directory that
will contain all the files you will create while using Webots,
including world file, controller files, object files, plug ins shared
libraries, etc. Once you chose a name for this user directory, you will
be asked to choose a location on your hard disk where to store it.
Then, Webots will create this directory at the specified location and
it will create all the subdirectories and files needed. Finally, it
will set this directory as the current user directory in the Webots
preferences. From there, you will be able to save all your Webots files
in the subdirectories of this user directory (world files, controllers,
etc.).
Note that the "don't hide me" window offers the AIBO's view of the
world:

Using the Aibo Control Panel
The Aibo Control Panel applet is integrated
into Webots. The Control Panel pops up when you
double-click on an Aibo robot in a Webots world. It is quite fun to manipulate
elements in this control panel--give it a try!
The title of the Control Panel window may show the name of the robot (if any
is defined in the robot's name field), and always shows the exact Aibo
model string. The status bar displays useful information such as success or
failure of requested operations, error reports, etc.
The Control Panel is divided up into three distinct panes:
-
Remote (network) functions pane: provides network connection and
remote management capabilities for use with a real Aibo robot (running the
custom RCServer software;
-
Manual controls and feedback pane: provides direct control over
Aibo's individual actuators (joints, plungers, LEDs), also serves to display
feedback data obtained from simulation or from remote robot, depending on
connection state;
-
Motion sequence (MTN) playback pane: provides management
capabilities for the motion sequence (MTN) files for both the simulated and the
real robot.
Once the simulation is started or a remote connection established, the
various controls can be used to change the state of the simulated or remote
robot.
One important element to understand is the Simulation check box. It
controls a notion known as simulation hook, which is the simulation
equivalent to the remote connected state:
-
Simulation checked:
simulation is hooked, in this mode the Control Panel has control over
the simulation; this means, internally, that changes to Control Panel active
elements (joint sliders, plungers, LEDs) are reflected on the simulation;
-
Simulation unchecked:
simulation is unhooked, in this mode there is no link whatsoever
between the simulation and the Control Panel; pure remote control is thus
possible.
Important: Unless a remote robot is connected to the Control Panel,
simulation is forced to hooked state. Once a remote connection is established,
it is possible to uncheck the Simulation checkbox and use
the Control Panel for pure remote control.
URBI (Universal Real-Time Behavior Interface)
As you have already learned, there are a variety of methods
available for
programming robots, and this is no different for the AIBOs. For this class, in
addition the simulation environment, Webots, we will be using a
scripting language
called URBI (Universal Real-Time Behavior Interface) which was
developed by Jean-Christophe Baillie
of Ecole Nationale Supérieure des Techniques
Avancées in Paris, France. URBI is a low-level command
language; sensors and motors can be read and set directly. It is
designed to be used in a client/server interface, meaning the user can
connect
directly to the robot to send commands remotely. Once a connection has
been
established with AIBO, you can send commands one line at a time, or
write an
entire program in a text file to be uploaded directly to AIBO's memory
stick. URBI
has already been installed on the memory stick of each AIBO.
Since you won't have access to the AIBOs outside of class, you
will be using the
robot simulator Webots. Fortunately, there is a version of URBI
designed specifically for use with the AIBO simulator in Webots.
In order to use URBI and interact remotely with AIBO, you will
need URBI Lab.
You can right-click to download it from a variety of places including urbilab-bin-windows-0.2.zip or
from SourceForge.net.
When the download completes, right-click on the file
and select "Extract files." You will probably want to choose the Programs folder to
save
the files to.
You will also
need to download
the version of URBI for Webots from webots-urbi-0.2.2.zip or
from www.urbiforge.com.
When the download completes, right-click on
the file and select "extract files." It is very important that you
extract these files into the correct place. Choose the main Webots
directory,
C:\Program Files\Webots
to extract the files. You will be asked to overwrite some files. Choose
"yes". Several additional AIBO worlds should have been added including
aibo_ers7_urbi.wbt, aibo_ers7_urbi_dance.wbt,
and aibo_ers7_urbi_soccer.wbt. Go
ahead and check them out in Webots.
Next we are going to connect the URBILab to Webots, so leave Webots open with aibo_ers7_urbi_soccer.wbt running because this will work best
for the next activity. When Webots is first opened four windows will open.
You can close them all except for the main window, called default.wbt. From
this window, open
the file called aibo_ers7_urbi_soccer.
The URBI Lab Program
First, we will do some things for convenience. You have installed the URBILab
into the C:\\Program, but no short-cut was put into the Start Menu. Double
Click "My Computer." Then double-click "Local Disk C:" Then Double-click "Program
Files" Then double-click "urbilab-bin-windows" Then right-click on "urbilab.exe,"
and "Create a Short Cut". Cut or Copy this short-cut and put it somewhere convenient,
like your desktop.
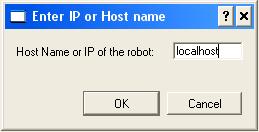
Next open the URBILab by double-clicking the new short-cut. When
URBILab asks for a host
name, type "localhost" into the field.
Now URBI Lab should be connected to Webots much
like it connects to the AIBO. You can send commands and the AIBO in the simulator
will follow them. (Remember for this connection to work, you must be running
a URBI world.)
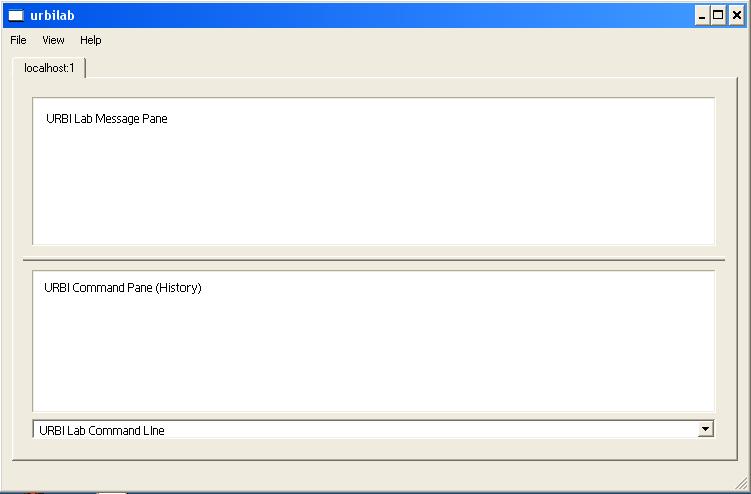
The URBI Lab
window is divided into three frames. At the top is the message pane. This
is where you will see feedback from URBI Lab on various things. This is
where you can see
the values of variables, any error messages, and frequent updates on
the battery life of the
AIBO. Below the message pane is the command pane. This is where you can
see the history of
all the commands you have sent during the current session. Below that
is the command line. This is where you will actually be entering
commands, one line at a time. For now, you will
only be using one-line commands.
URBI is set up with an initial set of movement functions.
A function is a set of commands that carries out a task. For now, you will
only be using built-in functions. Built-in functions are functions that are
already included in URBI, as opposed to a programmer-defined function, which
is a function that you create yourself. In URBI Lab, call the "Stand" function
by entering this command in the URBI Lab Command Line:
robot.stand();
This should cause AIBO to move itself to a standing position. Note that the
semi-colon "ends the command", so forgetting the semi-colon will not only cause
this command to do nothing, it will cause the next command to fail as well
(because the two commands will basically become one to URBI-Lab.) If you forget
the semi-colon, type just ";" to try to end the command.
Now try calling
the function that will make AIBO walk. Enter the command:
robot.walk(3000);
This will make AIBO walk forward for 3000 milliseconds. Alternatively, you
can use the command robot.walk(3s); to have AIBO walk forward
for 3 seconds. To have AIBO walk for a different amount of time, simply call
the function again with a different number in the parentheses. You can also
use a negative number to have AIBO walk backwards. For example, robot.walk(-4s); will
have AIBO walk backwards for 4 seconds. You can also make AIBO turn by using
the command:
robot.turn(xs);
...where x is the number of seconds you want AIBO to turn. Use a positive
number to have AIBO turn right, and a negative number to have AIBO turn left.
Here
is a list of all of the postures you can use when programming AIBO through
URBI in Webots:
- robot.stand();
- robot.sit();
- robot.lay();
- robot.initial();
- robot.beg();
- robot.stretch();
AIBO's Joints
The position of each of AIBO's joints is stored as a number
representing the angle of the joint's
movement. In URBI Lab, you can check the values of each joint. Enter
the command:
headPan.val;
This will display a number in the message window of URBI Lab
representing the position of AIBO's
left/right head movement joint. Here, headPan.val is a variable.
It represents the value
of the headPan joint. Essentially, headPan.val is a "container" holding
the value of the joint.
As the joint moves, headPan.val will change.
Making Assignments in URBI
As mentioned before, URBI uses variables to store the values of the AIBO's
joints. In RoboLab, variables were called containers, but in most programming
languages, they are called variables. In URBI, joints are moved by the programmer
by assigning a
value to the variable. Connect to the AIBO in Webots through URBI, have AIBO
move
to a sitting position, and try entering the following command:
headPan.val = 30;
Watch how AIBO moves its head.
This is called an assignment statement because we are assigning
a value to a variable. The syntax mean that we should assign the value
of the headPan variable
to 30. Note that the variable that is being set must be on the left-hand-side
and the value that it is being set to must appear on the right-hand-side. Using
this "dot" is a standard syntax typical of object-based and object-oriented
languages such as JavaScript, Java, and C++, and is called the "dot operator."
Note: In URBI Lab, you can view your previously
entered commands by pressing the up and down arrows
on your keyboard while the cursor is in the command line.
Here is a full list
of all of the joints you
can move in this way, and the range of values they can take:
|
Variable
|
Corresponding Joint
|
Range of Values
|
|
legRF1
|
Right Front Leg J1
|
-134,120
|
|
legRF2
|
Right Front Leg J2
|
-9,91
|
|
legRF3
|
Right Front Leg J3
|
-29,119
|
|
legRH1
|
Right Hind Leg J1
|
-134,120
|
|
legRH2
|
Right Hind Leg J2
|
-9,91
|
|
legRH3
|
Right Hind Leg J3
|
-29,119
|
|
legLF1
|
Left Front Leg J1
|
-120,134
|
|
legLF2
|
Left Front Leg J2
|
-9,91
|
|
legLF3
|
Left Front Leg J3
|
-29,119
|
|
legLH1
|
Left Hind Leg J1
|
-120,134
|
| legLH2 |
Left Hind Leg J2
|
-9,91
|
|
legLH3
|
Left Hind Leg J3
|
-29,119
|
|
neck
|
Neck Tilt 1
|
-79,2
|
|
headTilt
|
Neck Tilt 2
|
-16,44
|
|
headPan
|
Head Pan
|
-91,91
|
|
tailPan
|
Tail - Horizontal
|
-59,59
|
|
tailTilt
|
Tail - Vertical
|
2,63
|
|
mouth
|
Mouth
|
-58,-3
|
Try
playing around with the joints, making sure to keep the values within the defined
ranges, to get a better feel for how the joints move. Also, keep in mind that
when working with the actual AIBO, you should avoid moving a joint from one
end of the range directly to the other end. For example, if you set the legRF1
joint to -134, you should not suddenly assign the joint value to 120. Excessive
movement like this can cause too much wear on the joints.

In addition to moving joints, you can control several of AIBO's other features
through variable assignments. For example, you can control all of AIBO's LEDs.
All of the LEDs can be assigned a value between 0.000000 and 1.000000, where
0 is turned off completely, and 1 is illuminated, with varying levels of brightness
in between. Here is a list of all of AIBO's LED commands. Before trying out
the LED commands you may want to make sure all of the LEDs are turned off.
You can do this by using the command leds = 0;.
- ledF1 - ledF14 - AIBO's fourteen face lights
- ledBFC, ledBMC, ledBRC - Back LEDs; front, middle, and rear; color
- ledBFW, ledBMW, ledBRW - Back LEDs; front, middle, and rear; white
- ledHC and ledHW - Head LED; color and white
- modeB, modeG, modeR - Mode indicator light (blue, red, and green)
- ledWIFI - Wireless indicator light
You can also combine the blue, red, and green values of the mode indicator
light to create additional colors. For example, setting modeB=1 and modeR=1
would cause the light to appear purple. AIBO's ears are controlled in a similar
manner, using earL and earR.
Try changing these settings on the
simulated AIBO.
Note: Whenever you change the movement of either ear, you should always
set the ear value back to 0 immediately afterwards
Using Assignment Modifiers
As you have seen, assigning a value to a joint in URBI results in a rapid
jerk of that joint to the new position. Fortunately, there are several ways
to alter the movement of the joint. URBI has four different modifiers that
you can add after a simple variable assignment. Set the headPan joint to 0
and try the following commands. Make sure to set the value equal to 0 before
each one.
headPan = 30 time:2s; - This modifier causes the joint to move to the
new value over a given time period.
headPan = 30 speed:4.00; - This modifier moves the joint with a given
speed, in units per second.
headPan = 30 accel:2.00; - This modifier moves the joint with a given
acceleration, in units per second squared.
headPan = 0 sin:1s ampli:3, - This is a very unique modifier. It causes
the joint to oscillate around the value with a given period and amplitude.
Note that this command ends with a comma instead of a semicolon. This modifier
never terminates, meaning if a semicolon is placed at the end, no commands
that come after it would ever execute. Placing a comma at the end puts the
command in the background. This is useful for some specific AIBO actions, such
as having it wag its tail.
Note that you can assign a value to a joint using headPan rather than headPan.val.
While there are other fields to a joint, the value field is automatically recognized
without having to add the .val to the end.
Another useful modifier is the smooth:t command, where t is the time
in milliseconds. So headPan = 30 smooth:3000; would move the headPan
joint to 30 smoothly over a period of three seconds.
Try these commands on the simulated AIBO.
Making Comments in URBI
In RoboLab, explanatory comments were added to a program using the Edit Text
button: 
A
comment line in URBI is preceded by a # as follows:
# This is a comment line
Running Your Program in Simulation BEFORE running it
on the AIBO
It is important to perfect your program in simulation before running it on
the actual AIBO, so you can work out all the bugs in simulation. However,
in general,
it is more
useful
to simulate
an entire program, rather than a single command.
Fortunately, this is easy to do with URBI. Go to the directory C:\Program Files\Webots\data\urbi\aibo
and open the file "custom.u" with WordPad or NotePad. In this file, you can write your
own entire program for AIBO to run directly. In the "custom.u" file, write
the following program:
robot.stand();
robot.walk(3s);
robot.turn(5s);
robot.walk(3s);
robot.lay();
Save the changes to the file, and restart the URBI simulation. The
simulated AIBO should run the program you just made. The simulated AIBO
should stand up, take 3 steps forward, turn 5 steps to the right, walk
3 more steps forward, and lay down. Late, in this lab, you will
use this file to create a dance routine.
Using Tags
One very useful tool in URBI is the ability to tag
commands. You may have noticed that when the URBI message window
displays something, it includes this at the beginning of each line:
[138293:notag] 30.0000
The number at the beginning is a timestamp for the message.
After that is the
tag of the message. By default, most messages that appear won't be
tagged. You
can tag a command or variable with the following syntax:
mytag: headPan.val;
The message window would display this:
[123837:mytag] x
...where x is the current value of the headPan joint.
You can also tag commands and use the tag to carry out other actions
with the command. Try the following code in URBI Lab. Note:
When entering multiple
lines of code in URBI Lab, enter each line seperately. The code will
execute when
the semicolon is entered.
mytag: headPan = 0 sin:1s ampli:10,
Here, everything contained in the brackets is tagged under mytag.
This will cause AIBO's head to begin oscillating. Since
the oscillating command doesn't end on its own, it is useful to tag it
so that you
can force it to end. Try this command:
stop mytag;
This should force the action to stop. There are a couple of other
things you can
do with a tagged command:
block mytag; - This will prevent the
command from being executed. You can
unblock it by using unblock mytag;.
freeze mytag; - This will temporarily
suspend the command. You can resume
it by using unfreeze mytag;.
Other Useful Commands
echo - The echo command displays a value in
a system message. The most useful
implementation of the echo command is causing a program to return
values at important
points within a program for debugging purposes. Examples of the echo
command:
- echo 45; - Outputs the number 45.
- echo headPan.val; - Outputs the current
value of the headPan joint.
- echo "Hello"; - You can put a string of
text in quotes to have the console
output it as text.
stopall; - This will stop every running
command.
quit; - This will close the current URBI
Lab connection.
reboot; - This will reboot the simulated
AIBO.
shutdown; - This command will completely
shut down the simulated AIBO.
reset; - This does a software reboot on the
robot, causing it to reload the
programs on the memory stick.
Serial and Parallel
Command Execution
There are four different ways to execute consecutive commands
in URBI. One unique feature of URBI is the capability to execute
parallel commands. For example, you can have AIBO move two or more
joints simultaneously. Here are the four different
methods of command execution:
headPan = 30; headTilt = 30; - The headPan
joint moves, then there is a slight
pause before the headTilt command executes.
headPan = 30, headTilt = 30; - The headPan
joint begins moving, then the headTilt
command executes while the headPan joint is still moving.
headPan = 30 & headTilt = 30; -
Both joints begin moving at the same time.
headPan = 30 | headTilt = 30; - The headPan
joint moves to its destination, then
the headTilt command executes immediately
afterwards.
In many cases, the differences between these movements are
very
slight, and sometimes unnoticeable. The only one that is significantly
different is the & operator, and the , operator is important
when
having commands running in the background.
Command Grouping
In addition to altering how commands execute, URBI allows you
to group commands together
for more control using brackets. For example:
{headPan = 30 & headTilt = 30} | mouth = -20;
- With this command, the headPan and
headTilt commands (those grouped together inside the brackets) will
execute at the same time, then the mouth command will execute
immediately afterwards. This is a useful
feature, and is essential for AIBO's posture changing scripts.
Device Grouping
You are already somewhat familiar with device grouping because
of the leds = 0;
command. In this example, leds is a group
containing each of AIBO's LEDs. There
are several groups already defined for you:
- head {neck,headPan,headTilt,mouth}, - includes all of
AIBO's head joints.
- tail {tailPan,tailTilt}, - includes both of AIBO's tail
joints.
- ears {earR,earL}, - includes both ears.
- ledF
{ledF1,ledF2,ledF3,ledF4,ledF5,ledF6,ledF7,ledF8,ledF9,ledF10,ledF11,ledF12,ledF13,ledF14},
- includes all of AIBO's face LEDs.
- ledHead {modeR,modeG,modeB,ledHC,ledHW}, - includes all of
AIBO's head LEDs.
- ledBW {ledBFW,ledBMW,ledBRW}, - all of AIBO's back LEDs,
white.
- ledBC {ledBFC,ledBMC,ledBRC}, - all of AIBO's back LEDs,
color.
- leds {ledF,ledHead,ledBW,ledBC,ledWIFI}, - all of AIBO's
LEDs
There are also many groups for AIBO's legs:
- legRF {legRF1,legRF2,legRF3}, - AIBO's right front leg
joints.
- legLF {legLF1,legLF2,legLF3}, - AIBO's left front leg
joints.
- legRH {legRH1,legRH2,legRH3}, - AIBO's right hind leg
joints.
- legLH {legLH1,legLH2,legLH3}, - AIBO's left hind leg joints.
- legs {legRF,legLF,legRH,legLH}, - All of AIBO's legs.
- leg1 {legRF1,legLF1,legRH1,legLH1}, - Joint 1 of all four
legs.
- leg2 {legRF2,legLF2,legRH2,legLH2}, - Joint 2 of all four
legs.
- leg3 {legRF3,legLF3,legRH3,legLH3}, - Joint 3 of all four
legs.
- legF1 {legRF1,legLF1}, - Joint 1, front legs.
- legF2 {legRF2,legLF2}, - Joint 2, front legs.
- legF3 {legRF3,legLF3}, - Joint 3, front legs.
- legH1 {legRH1,legLH1}, - Joint 1, hind legs.
- legH2 {legRH2,legLH2}, - Joint 2, hind legs.
- legH3 {legRH3,legLH3}, - Joint 3, hind legs.
- legR1 {legRF1,legRH1}, - Joint 1, right legs.
- legR2 {legRF2,legRH2}, - Joint 2, right legs.
- legR3 {legRF3,legRH3}, - Joint 3, right legs.
- legL1 {legLF1,legLH1}, - Joint 1, left legs.
- legL2 {legLF2,legLH2}, - Joint 2, left legs.
- legL3 {legLF3,legLH3}, - Joint 3, left legs.
Note that to use these values, you can type or paste the command (like legRF1.val;
) into the URBI Lab Command line and see a value returned.
You can
create your own command group with
the following syntax:
group mygroup {tailPan,headPan,mouth}; -
This would create a group containing the
tailPan, headPan, and mouth joints.
You can also assign a value to every joint or LED in a group at one
time. For example, the
command legs = 45 smooth:3000; will set every joint
of every leg equal to 45 over
a period of three seconds.
The Task
Design your own short dance followed by final pose for the simulated
AIBO. Go to the directory C:\Program Files\Webots\data\urbi\aibo
and open the file "custom.u" with WordPad or NotePad. In this
file, write your own entire program for AIBO to run directly. In
the "custom.u" file, write your "dance routine."
There
are a huge number of listed commands above--use whichever ones you want
to and ignore the ones you don't want to use. You may want to
start by moving the joints until you
reach the desired pose, and writing down all of the values that each
joint will need to move to.
From the desired pose, you might decide which of the pre-programmed
positions
will provide the smoothest
transition to it. You will want to start from that position. Using
command grouping and parallel programming techniques, write the code
that will move the AIBO to your pose. If you were creating the program to run on a real AIBO, you would want to
make sure to use assignment modifiers to move the joints slowly, but in simulation, it does not matter.
Your Lab Report
In this lab, the director will be one who looks up a desired movement and then directs the movements. All
lab
reports
should
be
self-contained
and
should
contain
all
of
the
following information at the top:
- The lab number: Lab 17
- Who is has done the work:
- Scribe:
- Director:
- Programmer:
for this lab.
As usual, for this lab, your team will submit a Lab Report
entitled yourteam-L15.
For
the report, your team should discuss the answers to each of these
questions. Using correct spelling and good grammar, this lab should
then address the following questions:
- Dance program code: Paste your dance program from custom.u into your lab report.
- Dance program description: Describe your dance program as if you were describing the motions to someone who could not see the simulation.
- Compare and Contrast the Environments:
You have now seen two simulation environments, RoboAlice (PREOPS)
for the Create and Webot / URBILab for the AIBO.Write a paragraph
which compares and contrasts these two
simulation environments, you have seen being sure to identify
similarities as well as
differences.
- Comments and Suggestions: Write a
paragraph that summarizes your team's reaction to this
lab. If there are any problems you encountered or any questions that
remain, please ask! Also, be sure to include any suggestions you have
for how this lab could be improved.