Input and Looping
Objectives
- Synthesize concepts learned in previous labs.
- Learn more about looping and different types of loop constructs.
- Learn to communicate with the robot
Tools and Parts Needed
- Constructed 2-Wheeled robot
- The "bumper attachment"
- A second touch sensor for the controller
One of the more challenging types of programming is communication. In this lab, the engineer will learn to tell the robot information.
|
Looping We know that when we have a section of code which we want to repeat, the structure we need to do the repetition is called a loop. Remember that is generally a best practice to get the inside section of a loop working correctly before adding the loop structure. In RoboLab, we have seen the forever loop structure or infinite loop structure which will loop infinitely many times or until the batteries die or the engineer stops the program with the following set of icons:To create an infinite loop, we place the loop forever start
at the beginning of that section of code: and we place a loop forever end at the end of that section of
code: Alternatively, we can use Lands and Jumps to create an infinite loop:  is a Land Icon is a Land Icon is a Jump Icon is a Jump IconWe have seen that Land and Jump Icons also work in colored pairs to repeat sections of code forever. In RoboLab as in most programming languages, there are three or more main styles of loops – including the infinite loop, the while loop, and the counted for loop. We will use two new types of looping in this lab! |


|
Counted For Loops Counted for loops are loop structure that
repeat a section of code for a
predetermined count of times. The
counted for loop is begun and ended by:
In this example, the motor A moves forward for 8 seconds because the code is looping for 4 times and during each iteration motor A is moving for 2 seconds. Note that you can use a counted loop with a constant as shown or with the value stored in a container. |
 Always remember, the Start of Loop
(white) should be placed at the beginning of the code you want
to repeat and then the End of Loop (black) should be placed at
the end of the section of program that you want to repeat.
Always remember, the Start of Loop
(white) should be placed at the beginning of the code you want
to repeat and then the End of Loop (black) should be placed at
the end of the section of program that you want to repeat. Loops can help in making your program short and save programming time. They also help to make the program more easily understood. In the following example, the program is supposed to make 8 beep sounds. You can see how tedious the program looks without the looping property.
Without a loop: 
Using a counted for loop: 
Another example: A robot should move in an approximately square path with sides of 6 seconds in length.
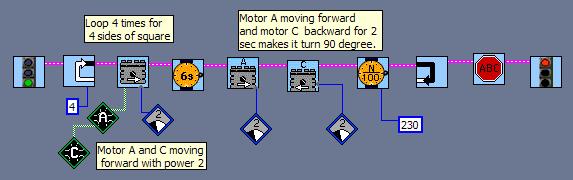
You can download this program by right-clicking square and testing it.
Here is another example of a counted for loop:

If you can determine what this code does, it will be useful in this lab!
|
While Loops
The while condition can be set by using the light sensor, touch sensor, timer, container value, etc. All of the icons to the right are while loop conditions which can be used to "begin" the while loop structure: Note that the the Start of Loop icon here is different from the icons that started the counted for loops, but the End of Loop icon is actually the same.
It is important to note that in this example, if the touch sensor is never pressed the robot will never stop driving forward. While Loops are not the same as conditional forks! Note that students sometimes confuse the while loop with the conditional fork, but they really are different! Consider the example that we saw last time, if the touch sensor is not pressed, the robot will move backward for 4 seconds and end the program, otherwise (meaning if the touch sensor is pressed), the robot will stop and the play red scroll music and end the program. Notice that with a conditional fork, the robot will simply take one branch of the fork or the other, the conditional test will not be repeated (unless you put this whole structure inside of some kind of a loop.) 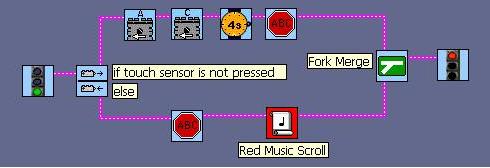
In this lab, we will need a while loop structures
and containers. In previous labs, we have made use of the red
container to store numeric values using A different container that we have not used in previous labs
is the Clicks Container,
|
 While Loops
contain a sequence of program icons that are will repeat while
the given loop test condition is true. Each of these while
loop structures must be "ended" by the Return From Loop icon:
While Loops
contain a sequence of program icons that are will repeat while
the given loop test condition is true. Each of these while
loop structures must be "ended" by the Return From Loop icon:
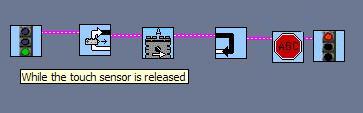 As an example, the
while loop at left will repeatedly drive Motor A forward while
the touch sensor is released. In other words, Motor A will
keep on moving forward while touch sensor is not pressed. When
the touch sensor is pressed, the loop will end, so the flow of
control will resume just after the Return From Loop icon,
which in this case means the program will stop.
As an example, the
while loop at left will repeatedly drive Motor A forward while
the touch sensor is released. In other words, Motor A will
keep on moving forward while touch sensor is not pressed. When
the touch sensor is pressed, the loop will end, so the flow of
control will resume just after the Return From Loop icon,
which in this case means the program will stop. , so the
following loop test conditions which used this container are
probably self-explanatory because they make use of testing
numbers in this container:
, so the
following loop test conditions which used this container are
probably self-explanatory because they make use of testing
numbers in this container: 
Nested Loops
Like the nested conditional statement, a nested loop is simply a loop inside of a loop. Nesting is allowed in RoboLab up to 15 loops deep.
Your Task
Have you ever seen a "dog trick" such as seeing a dog count with its paw? You can see a dog named Maggie count on youtube. We can tell that Maggie knows how many the number is because she repeats the weird behavior of picking up and putting down her right foot exactly that many times. Check it out:In this lab, your team is required to do a "robot trick" of having your robot count! The engineer will use the touch sensors to tell the robot a number. The robot will remember that number and will then show off that it remembers the number by doing a weird behavior exactly that many times with pauses in between. What weird behavior? The weird behavior is anything you choose which is distinct, recognizable, and repeatable. The weird behavior also must be followed by a pause each time. For example, your robot might spin around, stop, beep, and then wait. So, if the engineer enters the number 3, the robot will do the following: 1) spin around, stop, beep, and then wait; 2) spin around, stop, beep, and then wait; and 3) spin around, stop, beep, and then wait.
In the first three steps, you're going to slowly expand some pseudocode.
You're going to start by writing a small amount of pseudocode. Then, you'll expand it, so that it does more. Finally, we'll add in a counted loop, so that it properly does the whole task.
- FIRST, Convert the following to pseudocode:
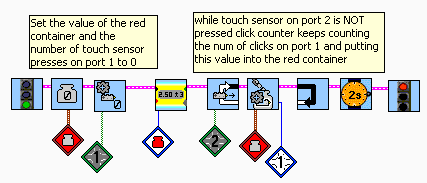
Think carefully about how this works to have the engineer enter his or her guess at the number by using 2 touch sensors connected to input ports 1 and 2. The code first clears out both the red container and the clicks container. (This zeroing out is essential here!) Then it uses a while loop to loop while the touch sensor on port 2 has not been pressed. The bumper must be connected to port 1 because this is where the clicks container is counting clicks. It then uses to loop while the bumper has not
been pressed. It uses the clicks container,
to loop while the bumper has not
been pressed. It uses the clicks container,  to store the
number of clicks. The loop is only going to end and to stop
counting clicks when the touch sensor (not the bumper--the one
connected to port 2) is pressed. When the loop ends, it moves the
value of the clicks container into the red container. Now the
number is stored in the red container where the robot can use it.
Please be sure everyone really understands how this code works.
to store the
number of clicks. The loop is only going to end and to stop
counting clicks when the touch sensor (not the bumper--the one
connected to port 2) is pressed. When the loop ends, it moves the
value of the clicks container into the red container. Now the
number is stored in the red container where the robot can use it.
Please be sure everyone really understands how this code works. - NEXT, Create pseudocode which shows the entered number on the LCD
screen
 .
. - FINALLY, Next use pseudocode to employ a counted for loop to make the weird behavior happen the correct number of times. Remember that the weird behavior is that robot will do something like spinning around, stopping, beeping, and then waiting.
- After designing your algorithm in pseudocode, implement the algorithm in RoboLab.
- Be sure to include explanatory comments to your RoboLab code by
using the Edit Text icon:
 In particular, it is required that you add
the following comments:
In particular, it is required that you add
the following comments:
- Lab L10
- All of your team member's names
- Comments on each important section of code
- Finally, modify your pseudocode, robot, and RoboLab program to improve your robot's performance.
- Answer the questions in your Lab Report.
Your Lab Report
All lab reports should be self-contained and should contain all of the following information at the top:- The lab number: Lab L10
- How long each person served in each of the roles:
- Driver:
- Navigator
- Your Pseudocode: Include your pseudocode in your Lab Report, being sure that your pseudocode does a good job explaining how each portion of the algorithm works. (Be sure not to gloss over important details, especially in the conversion of the given counting code into pseudocode.)
- Your Robot: Describe which sensors and actuators need to be attached to which ports for your implementation to work. This is especially crucial in this lab because if the two touch sensors are hooked up wrong, the robot will not work as expected!
- Communication: Describe precisely what communication is to be expected from the engineer, being sure to explain this carefully enough that a person who is not in the class could communicate with the robot giving the robot a number to remember. Since there are two touch sensors, be sure to be really clear about how to use each of them.
- Your Chosen Weird behavior: Describe what you are having your robot do as it counts. Remember that the chosen weird behavior is anything you choose which is distinct, recognizable, and repeatable. It also must be followed by a pause each time.
- Your Success: In a paragraph or so, describe any additional information which is needed to use your program and whether or not your robot functions as desired. If not, what goes wrong and under what conditions?
- Comments and Suggestions: Write a paragraph that summarizes your team's reaction to RoboLab and to this lab. If there are any problems you encountered or any questions that remain, please ask! Also, be sure to include any suggestions you have for how this lab could be improved.