Assignment A7: HTML Editors and Web Authoring Systems
Learning Objectives
Learn to design and modify tables using a complete Web Authoring System to do the following:
- Entering, editing, and spell-checking text.
- Inserting images.
- Creating and editing links.
- Inserting and editing lists.
- Creating and editing tables.
Using a Web Authoring System
This assignment must be completed individually.
A Web Authoring System is more than just an HTML editor. Web authoring tools generally include an HTML editor as well as tools for managing web sites.
Dreamweaver is a popular commercial web authoring tool which runs on Mac as well as Windows (but not Linux) and which is currently running $300-$400. Because Berea College owns a license for it, you may download a key-served copy on to your computer from the Add/Remove Software icon in your Control panel. Please note that you will only be able to use it while connected to the College network. Because of the size of this program, we will not all be able to install it from the server at once, in a timely fashion. If you have an interest in Dreamweaver, you may install it on your own later on. A good alternative to Dreamweaver, which is a much more light-weight download is a web authoring program called KompoZer.
KompoZer, formerly called NVu, is an open source tool which runs on a larger variety of computer platforms and which is freely available on the web from sites such as SourceForge.net. Please download this program, as we will be using it for the assignment in class today. Both of these programs have advantages and disadvantages, but both have good WYSIWYG (What You See Is What You Get) HTML editors which not only include nice features such as spelling checkers but also create properly structured HTML code and support the use of CSS. I can recommend both programs, and have both installed on my laptop.
If you create a new document in KompoZer and look at the source HTML code, you will see the following:
<!DOCTYPE html PUBLIC "-//W3C//DTD HTML 4.01//EN"
"http://www.w3.org/TR/html4/strict.dtd">
<html>
<head>
<meta content="text/html; charset=ISO-8859-1"
http-equiv="content-type">
<title></title>
</head>
<body>
<br>
</body>
</html>
This is a property structured HTML document which could be easily edited in Notepad or Dreamweaver without difficulty. We see that there are only two HTML element which we would not have put in by hand, namely an extra !DOCTYPE element, and an extra META tag. Both of these are acceptable HTML tags. Dreamweaver creates a very similar HTML document.
Several versions ago Microsoft Word added a "Save As HTML" feature. Be forewarned that Word was not created as an HTML editor (They made FrontPage for that), and Word has a great deal of functionality which is not supported in HTML. So, the bottom line is using the "Save as HTML" feature in Word will create a mess of HTML which is virtually indecipherable. Feel free to try it (as an experiment only). Dreamweaver actually has an option for "Cleaning Word Generated HTML," which attempts to remove all of the unnecessary tags Word inserts.
Using a Web Authoring System
Now that you have learned the basics of HTML syntax in Notepad, this assignment will help you to learn to create web pages more quickly than might be possible by typing HTML directly. As a person who creates many web pages, I find that I continue to use both HTML as well as web authoring systems, so it is important to be versatile with both. Note that you will still be held accountable to being able to create HTML directly!
Your Assignment
This assignment must be completed individually, but may be used as part of your personal web page.
KompoZer is a complete Web Authoring System which includes an HTML editor, browser previewer, and ftp assistance for uploading to name a few features. Because it has a WYSIWYG editor, it is reasonably intuitive to use, but there are a few features you may not expect. Your assignment today is to spend the class time in familiarizing yourself KompoZer. Once you have it installed, go to any of the html files that you have created in Notepad, right-click on the name of the html file and select edit in KompoZer.
Look either at near the bottom of the window in KompoZer
for  . Click
on each of these buttons or tabs to see how you can see view the HTML
code,
just the body of the HTML document, or other views. You can edit in
each of these modes, and you can move among them.
. Click
on each of these buttons or tabs to see how you can see view the HTML
code,
just the body of the HTML document, or other views. You can edit in
each of these modes, and you can move among them.
In particular, I would like you to work with this program to edit your personal web page as well as to make a new web page. Be sure to explore all of the following features:
- Use one of your existing HTML documents for adding, editing, and formatting text. Be sure to look at the HTML code that is generated.
- Use one of your existing HTML documents to check out the spelling checker. Your personal web page is expected to be free of spelling errors and typos when it is submitted.
- Create a new HTML document entitled yourusername-A7.html and change the Page Title to, "Assignment A7 by your real name". Set the background color for the page a very light color such as light yellow or or light green or light pink.
- Insert an image into yourusername-A7.html. Note that the alt, width, and height elements are all easy to add! Be sure to look at the HTML code that is generated.
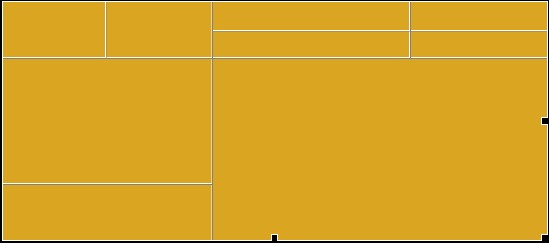
- Next you will insert a complicated table in yourusername-A7.html
and use it for further experimentation.
In particular, try using Kompozer to create
a table in that looks
like the one below. To do this you will need to use it to "merge
cells." Be sure to look at the HTML code
that is generated.
- In yourusername-A7.html,
notice that the table
has 9 cells. Find your favorite picture from the Internet, and then
insert a local copy of that picture in the first cell. Under the
picture put the URL from which you got the picture, and link this URL.
All should be done in the first cell. Then look at the HTML code that
was generated.
- In the second cell in the table in yourusername-A7.html,
type a
sentence or two as to why you like the picture. Make use of italics and
boldface through HTML tags. Then look
at the HTML code that was generated.
- In the third cell in yourusername--A7.html,
create
an e-mail link, so that once clicked, a new window should open that you
can type in. In you need to, see the help instructions under creating
an e-mail link.
Then look at the HTML code that was generated.
- In the fourth cell in yourusername--A7.html,
enter
another table. This is called nested table (a table inside an existing
table). See the instructions under creating a nested table. Then look
at the HTML code that was generated.
- In the fifth cell in the table in yourusername-A7.html,
insert a
map of the continent you are from. Align the map to the right. Link the
image to the site where you obtained the image. Do not make this an
image map. It should be just a simple linked image. To the
left of the image, write a brief description of the town you grew up in
and where it is located in the continent. Then look at the HTML code
that was generated.
- In the sixth cell in the table in yourusername--A7.html,
use the
map of the continent you are from to create a clickable image map with
at least two hotspots. To do this, read the instructions under creating
image maps. Then look at the HTML code
that was generated.
- In yourusername-A7.html, make
the color of the seventh
table cell different from all the other cells and look at the HTML code
that was generated. Then leave the seventh cell
blank.
- In the eighth cell in this table, be creative
with your the
display of your name. Then look at the
HTML code that was generated.
- In the last cell of this table, enter an HTML
bulleted list to write a few of sentences
on what you have learned from this assignment. Include a bullet on how
helpful this assignment has been to gaining comfort with using a Web
Authoring system. Change the color of the text in the list to any
color other than black. Be sure to look at
the HTML code that was generated.
- Put all the files needed by yourusername--A7.html in a folder entitled yourusername-A7 and compress it. Turn in the entire yourusername--A7 folder to the "A7" drop in Moodle.
What to Submit for this A7 Assignment:
- A zipped copy of a new folder called yourusername-A7 which should now include:
- yourusername-A7.html
- copies of all images needed by this web page, with correct file extensions and no spaces in the filenames.
- Turn yourusername-A7 into the appropriate place in Moodle.